

Dining Manners in American Business
Excerpt from Dining Manners Section in Navigating Virtue: Ethics and Etiquette in the American Business Landscape
by Phyllis Davis
 Imagine this: you step into a chic, upscale restaurant with your clients or associates and you are greeted by the tantalizing aroma of gourmet cuisine and the soft glow of candlelight. As you settle into your seats, you’re not just embarking on a culinary journey—you’re embarking on a journey of relationship-building, negotiation, and collaboration.
This ‘post’ is a small portion of the full chapter on Dining Manners in American Business published in my new book, Navigating Virtue: Ethics and Etiquette in the American Business Landscape. In the book we cover far more than table manners. We explore being a guest at a business meal, ordering, pairing a meal choice with a wine, paying the bill and more.
Do you know how to navigate this intricate dance of business dining with finesse and flair? That’s where I come in. In this section, I, your humble Ethics and Etiquette Expert, will take you on a whirlwind tour of business dining, from selecting your meal and mastering the art of conversation and networking over a sumptuous meal.
These are the eating utensils are often delivered along with the dish in restaurants.
- If you order soup, the soup spoon will arrive before your soup is served, or occasionally, it will be served on the side of the dish next to your soup bowl. If you are at a banquet with a preset menu, the soup spoon will be present when you sit down and placed to the right of the coffee spoon on the right side of your plate.
- In more formal restaurants, your primary utensil will be placed next to your dinner plate at the table before you are seated.
- In more casual dining establishments, the utensils may be wrapped in a cloth napkin:
- The cloth napkin generally contains three utensils: a dinner fork, a knife, and a coffee spoon.
– Place these utensils on the tablecloth, as in Setting Diagrams 1 and 2.
– The dinner fork is placed on your left.
– If you order a salad, your server will either place the fork before the salad is served on the left of your dinner fork or offer your salad fork when the salad is served.
– As you will see in Setting Diagrams 1 and 2, the salad fork is placed on the left of the dinner fork before eating your salad.
– After eating your salad, you will never return the fork to the table. It will always remain on the salad plate until the salad plate, or bowl, with the salad fork, is removed by your server.
- On the right side of your plate, place the knife with the blade facing the plate.
- Place the coffee spoon to the right of the knife.
- If you want coffee served with your meal, tell your server when you order your meal.
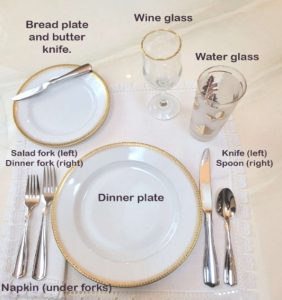
Diagram 1

Diagram 2
Napkin Etiquette:
Upon being seated, the first order of business is to unfold your napkin and place it on your lap with the fold facing toward your knees. Never flap your napkin open. Instead, carefully unfold it and place it in your lap. The napkin should stay on your lap throughout the meal to discreetly dab your mouth or blot spills. When blotting your mouth, use a corner of the napkin so that if you leave the table temporarily, you can fold the blotted portion of the cloth underneath the napkin to conceal food stains from other dining guests.
If you need to excuse yourself temporarily from the table, loosely fold your napkin to hide the stains and place it on the left side of your plate. This signals to the waitstaff that you intend to return.
At the end of your meal, as you and other guests rise to leave the table, you will also place your neatly folded napkin to the left of your plate. Avoid crumpling the napkin to put it back onto the table.
Bread and Butter:
Handling bread and butter at business meals in a nice restaurant requires a balance of etiquette and professionalism. Here is a guide to navigating this aspect of the dining experience with finesse:
In most upscale restaurants, bread is typically served before the server takes your meal order. This is called ‘the bread course.’
It is customary to offer bread as a complimentary appetizer to whet diners’ appetites while they study the menu and wait for their order to be taken.
Wait for the host before reaching for the breadbasket. Waiting for the host to initiate the bread service is a courteous gesture. They may offer to pass the breadbasket around the table to their right.
If you or any of your dining companions have dietary restrictions or food allergies, be mindful of which bread items are safe to consume. If unsure, do not be shy about asking the server for guidance.
A small butter knife will rest on the bread plate, which is located on the left side of your dinner plate, above the forks.
If bread plates are provided at each place setting, use them to hold your bread and butter, tiny bits of butter rappers, or olive pits. If there is no designated bread plate, you can place your bread directly on the edge of your dinner plate.
However, it is essential to note that the timing of bread service can vary depending on the restaurant’s policies and the server’s style. Sometimes, bread may be offered after the meal order has been taken or alongside the appetizers.
Use the ‘bread course’ to engage in light conversation with your dining companions. Avoid discussing business matters until after the main course has been served, as the bread course is meant to be a time for socializing and building rapport. Try practicing The 30-Day Rule and engage in small talk.
If the breadbasket is passed around the table, take one or two pieces of bread using the serving utensils provided. Avoid touching the bread in the basket with your hands; utilize the tongs to transfer the bread to your bread plate.
If the butter is served alongside the bread, use the butter knife (as seen in Setting Diagrams 1 and 2) to transfer a small portion onto your bread. Avoid taking too much butter or spreading it directly onto the entire slice of bread. Now, you can touch the bread by tearing off small pieces with your hands and buttering the bite of bread as you eat.
While enjoying your bread and butter, be mindful of your table manners. Chew with your mouth closed, and use your napkin to dab away any crumbs from your mouth or hands discreetly.
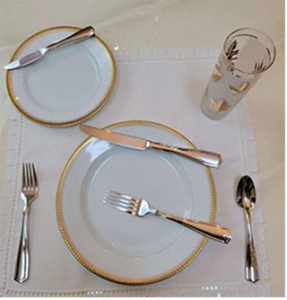
Diagram 3
Utensil Usage for your main course
To remind you, your salad fork and dinner fork are placed to the left of the dinner plate. (Setting Diagrams 1 and 2). The salad fork is the smaller of the two forks and is placed to the left of the dinner fork. If you order a salad or an appetizer, you will use the salad fork; if you do not order a salad or an appetizer, ignore the fork. When your main course arrives, choose the larger of the two forks, closest to the dinner plate, to eat your meal.
You will find your dinner knife and a coffee spoon on the right of the plate. (Setting Diagrams 1 and 2). If you do not order coffee, ignore the spoon. You may use your knife to cut food on your dinner plate.
During your meal, if you know you will use the knife and will use it again during your meal, place it on edge at the top of the plate, with the tip of the blade facing (approximately) toward 10:00. The knife blade laid along the 10:00 and 2:00 positions. (Diagram Setting 3).
The fork can rest in the center of the plate, with the tines facing upward in a “rest” position (Diagram Setting 3).
Take manageable bites and chew with your mouth closed. Use your utensils to cut and eat food rather than pick it up with your fingers.
Lift the knife in your dominant hand (right or left hand), and with the opposite hand, lift the fork and place the tines upside down on top of the meat to hold it in place while you cut it. Place the knife’s blade against the meat’s grain and apply gentle pressure to make the initial cut. Use a short sawing motion rather than pressing down forcefully to avoid crushing the meat.
For tender cuts of meat such as steak or roast beef, aim your knife against the grain to maximize tenderness. Cutting against the grain shortens the muscle fibers, resulting in more tender and easier-to-chew pieces.
Having made the initial cut, slice the meat into bite-sized portions using the knife’s back-and-forth motion. Take care to maintain a consistent thickness for each slice to ensure proper cooking and presentation. Do not cut the entire piece of meat into bite-sized pieces. Cut one or two pieces at a time.
As you cut each slice of meat, use the fork to stabilize it on your plate. This helps prevent the meat from sliding around and makes it easier to cut through.
After cutting a piece or two of meat, place the knife at the head of your plate, with the tip of the blade facing 10:00 and the knife resting on the top of the plate in a 10:00 and 2:00 position (Diagram Setting 3), then, change hands and use the fork to lift the meat from your plate and transfer it to your mouth.
Now that you have moved the meat from your plate to your mouth, chew with your mouth closed. Take your time to savor the flavors and textures of the beef before swallowing.
Cut and eat the meat into bite-sized portions, alternating between the knife and fork as needed. Take breaks between bites to engage in conversation and enjoy the dining experience.
Following these steps, you can effectively cut and eat the meat with a knife and fork while demonstrating proper etiquette and refinement at the dining table.
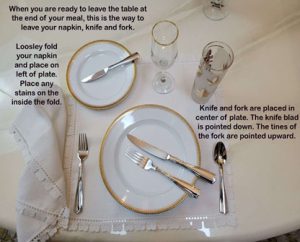
Diagram 4
If you eat faster than other people, slow down.
Do not indicate you have finished your meal before others have completed their meal. Then, place your silverware as indicated below in Diagram Setting 4.
As the other people at your table begin finishing their meal (and not before), it’s now time to place the knife and fork side-by-side vertically on the center of your plate. Imagine a clock face on your plate. Ideally, the handles of the utensils should rest at 4 o’clock, and the tines/blade should point diagonally towards 10 o’clock. (Diagram Setting 4)
The fork should be positioned below the knife, with the tines facing up. The knife blade should be pointed toward the fork.
This is the most widely accepted method in the United States of America.
Additional Tips: Do not cross your utensils over each other or place them on the table. Once you have finished your meal and the other guests at the table have finished theirs, you all stand to leave the table. Gently fold and place your napkin unfolded on the table to the left of your plate as indicated in Diagram Setting 4.
